Electroplating combines art and science, especially when achieving zero defects. Everything starts with the perfect plating rack, and getting flawless results from your work requires precise tools. If you are a professional looking to polish your work or a beginner wanting to learn the ropes, choosing the best plating rack solution is key for winning. This guide is focused on revealing all the options out there, outlining the most important features to consider, and sharing tips to aid in leveling up your electroplating processes. Prepare to discover new discoveries alongside tried-and-tested methods meant to improve your workflow, efficiency, and results.
What Is a Plating Rack and How Does It Work?
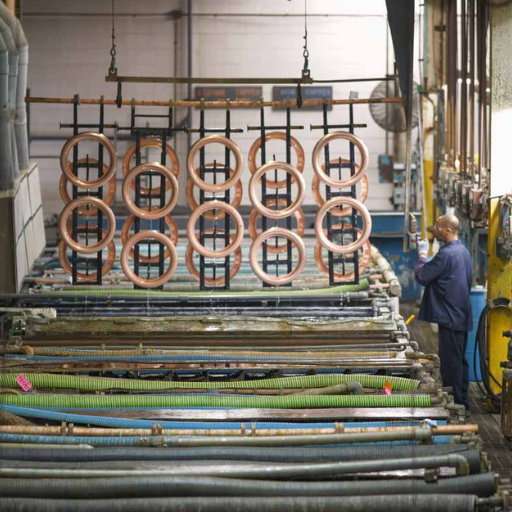
A plating rack is a specialized tool used in electroplating to securely hold parts during the plating process. It ensures that the parts are suspended in the plating solution, allowing for even distribution of the coating material. The rack is typically made of conductive materials to facilitate the flow of electrical current, which is essential for the electroplating reaction. Its design allows for minimal contact with the parts, preventing defects while maintaining proper conductivity.
Understanding the Rack Plating Process
The rack plating process involves a series of precise and controlled steps to ensure optimal coating quality. First, the parts to be plated are securely mounted onto the plating racks to ensure proper electrical conductivity and stability during the procedure. Next, the parts undergo thorough cleaning to remove any oils, dirt, or residue, typically through a combination of degreasing, acid etching, and rinsing to prepare the surfaces for plating. Once clean, the rack, along with the mounted parts, is immersed into a plating bath containing the solution of the desired metal, such as nickel, chrome, or gold.
An electric current is then applied, facilitating the electrochemical deposition of the metal onto the parts. This ensures a uniform and durable coating that meets the required specifications. After the plating process, the parts are removed, rinsed to get rid of any residual chemicals, and dried thoroughly. Quality checks are performed to ensure the plated metal meets standardized thickness, adhesion, and appearance requirements. Throughout the process, maintaining precise control over variables like bath temperature, current density, and solution composition is key to achieving consistent and high-quality results.
Key Components of a Plating Rack
- Rack Frame: The main structural support, typically made from durable materials like stainless steel or titanium, ensures stability and reliability during plating cycles.
- Contact Points: These areas establish an electrical connection between the rack and the workpieces, often coated with conductive and corrosion-resistant materials like silver or gold to maintain efficient current flow.
- Hooks and Clamps: Adjustable fixtures designed to grip parts firmly while minimizing contact marks, critical for ensuring uniform plating and aesthetic quality.
- Insulators: Installed to prevent undesired electrical flow, these elements protect non-target areas and enhance process efficiency.
- Hanger or Arm Assembly: Facilitates the attachment of the rack to the plating line, making it easier to immerse and remove from the bath.
- Coating or Masking: Protective layers applied to non-conductive areas of the rack to increase its lifespan and ensure consistent electrical operation.
Advantages of Using a Plating Rack in Metal Finishing
Enhanced Efficiency: Plating racks streamline the electroplating process by securely holding parts in place and ensuring consistent contact with the solution. This reduces the time and labor needed for manual adjustments and increases productivity.
Uniform Coating Quality: By maintaining stable positioning and electrical contact for all parts, plating racks enable an even distribution of metal coating. This consistency improves the overall quality and durability of the finished surfaces.
Material and Cost Savings: Plating racks minimize material waste by optimizing the use of plating solutions and reducing the need for excess coatings. Additionally, the precise application results in fewer defects, lowering production costs.
Customization and Scalability: Racks can be customized to accommodate various shapes and sizes of components, making them suitable for diverse manufacturing needs. They also support high-volume production, making them invaluable in industrial-scale metal finishing.
Extended Equipment Longevity: Features like masking and durable coatings protect racks from wear, extending their service life and reducing the frequency of replacements. This adds to overall cost efficiency.
By leveraging these advantages, manufacturers can achieve superior results, lowering costs while maintaining high-quality standards in metal finishing.
How to Choose the Right Metal Plating Rack for Your Needs?
Consider Your Plating Process: Choose the correct type of plating for your process, such as electroplating or anodizing. Select racks that can withstand the chemical and temperature elements involved at the process.
Evaluate Material Compatibility: Make certain that the rack materials do not pose the risk of contamination or plating interference in relation to the parts, racks and plating solution fabrics.
Look for Customization Options: Select racks that provide adjustment for unique parts which allow proper placement for effective even coating.
Prioritize Durability: Pick racks that feature abrasive resistant protective coatings or masking designs which are easy to clean and maintain and maximize equipment life while minimizing work disruption.
Make sure to consider these factors when selecting a metal plating rack so that the productivity goals set by the business are achieved.
Factors to Consider When Selecting a Plating Rack
- Material Compatibility: Choose racks made from materials resistant to the chemicals used in your plating process, such as stainless steel or titanium. This prevents contamination and enhances longevity.
- Electrical Conductivity: Ensure the rack provides consistent electrical contact with minimal resistance. Proper conductivity is essential for achieving uniform plating thickness.
- Design Versatility: Opt for modular or adjustable designs that accommodate various part sizes and shapes. Versatile racks increase productivity and reduce downtime during setup changes.
- Ease of Maintenance: Select racks that are easy to clean and maintain, particularly if they will be exposed to harsh chemicals or frequent use. Simplified maintenance extends the lifespan of the racks.
- Load Capacity: Verify the rack’s ability to handle the weight of your parts without bending or distorting. High load capacities are critical for safeguarding part integrity.
Comparing Plating Racks Suppliers and Their Offerings
Striking a balance between customization, support, and quality while sourcing plating rack suppliers is crucial. Remember these pointers.
Innovation and Product Variety: The best suppliers offer to a range of industries, such as medical and automotive, plating racks tailored to their specific needs. They also incorporate new designs and add materials such as titanium and specialized coatings to address stringent operational requirements and slow corroding over time.
Customization and Engineering Support: Primary fabricators focus on providing tailor-made solutions and custom racks for clients, working with them to ensure optimum product protection and efficient handling during electroplating cycles. Many providers also have on-site engineering personnel for prototyping and adapting to specific production lines.
Plating racks structural integrity, durability and maintenance: Top ranked suppliers maintain and improve chemical exposure and frequent use designed features of the racks to extend, and reduce wear, ensuring reliable performance and reduced downtime.
Lead Times and Cost: All other top providers maintain competitive pricing and lead time. Discounts are often offered for bulk orders, and clear timelines for delivery and manufacture enhance production planning.
Customizing Your Plating Rack for Optimal Performance
Customizing your plating rack involves tailoring its design for specific operational needs, which enhances efficiency, consistency, and throughput. Here are some key considerations:
- Material Selection: Choose materials that resist corrosion and are compatible with your plating solutions. Common options include stainless steel and titanium, known for durability and longevity under harsh conditions.
- Rack Configuration: The design should maximize surface area exposure while maintaining proper spacing to ensure uniform plating. Adjustable or modular features can increase flexibility for handling various part sizes and shapes.
- Electrical Connections: Optimal conductivity is crucial. Ensure contact points are precisely designed and maintained to reduce resistance, minimizing defects and ensuring even coating.
- Ease of Maintenance: Incorporating features like removable components and ergonomic designs simplifies cleaning and repairs, increasing the rack’s lifespan and minimizing downtime.
- Custom Coatings and Insulation: Protective coatings or insulation layers can prevent unwanted reactions, reduce contamination risks, and improve performance in aggressive chemical environments.
What Are the Common Types of Plating Racks in the Industry?
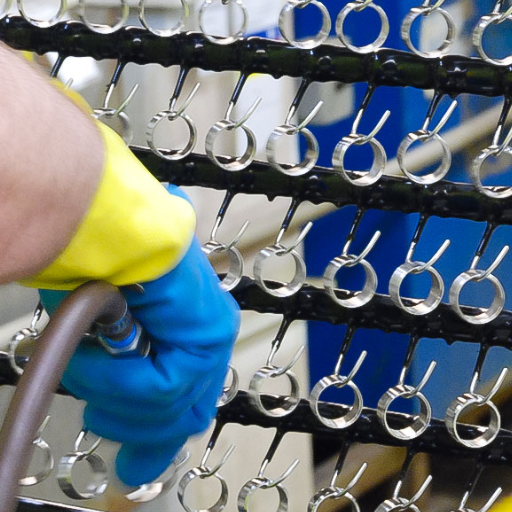
- Hook Racks: These simple racks use hooks to secure parts during plating, making them versatile and easy to adjust for different component sizes.
- Frame Racks: Designed to hold multiple parts at once, frame racks are ideal for high-volume plating operations and ensure consistent plating coverage.
- Basket Racks: Often used for small, lightweight components, basket racks allow for bulk plating of numerous items simultaneously.
- Custom Racks: Tailored to specific parts or applications, custom racks optimize efficiency and quality for unique plating requirements.
Exploring Basket and Rack Plating Methods
Basket plating and rack plating are two commonly used methods, each with advantages suited to specific applications. Basket plating is ideal for coating small, bulk items like screws, nuts, or other hardware. Items are placed in baskets, allowing for efficient processing of large quantities, though the random positioning may result in uneven coatings or minor surface damage. This method is cost-effective for non-cosmetic applications where uniformity isn’t critical.
Rack plating, on the other hand, is designed for larger, more complex, or delicate components that require precise and uniform coatings. Parts are individually mounted on racks, ensuring proper positioning and minimizing the risk of surface damage. While this method is more time-consuming and costly, it delivers higher-quality, controlled results, perfect for aesthetically critical or high-performance parts.
Ultimately, the choice between basket and rack plating depends on the material, size, and intended use of the product, with each method offering specific efficiencies and quality outcomes for various industries.
Differences Between Barrel Plating and Rack Plating
Barrel plating and rack plating are distinct electroplating methods tailored to different product needs and configurations. Barrel plating is ideal for plating small, durable parts in bulk, such as screws, nuts, or washers. The process involves tumbling components in a rotating barrel filled with plating solution, offering high efficiency and cost-effectiveness. However, it may produce less uniform finishes and cannot accommodate delicate or large items due to potential damage during tumbling.
Rack plating, on the other hand, is suited for larger, fragile, or uniquely shaped components that require careful handling. Parts are individually mounted on racks to ensure precise positioning and a uniform coating. This method provides a higher-quality finish but involves greater labor intensity and cost. Rack plating is often chosen for aesthetically sensitive items or parts with complex geometries requiring consistent, controlled coverage.
How Can Plastisol Coating Enhance Your Plating Racks?

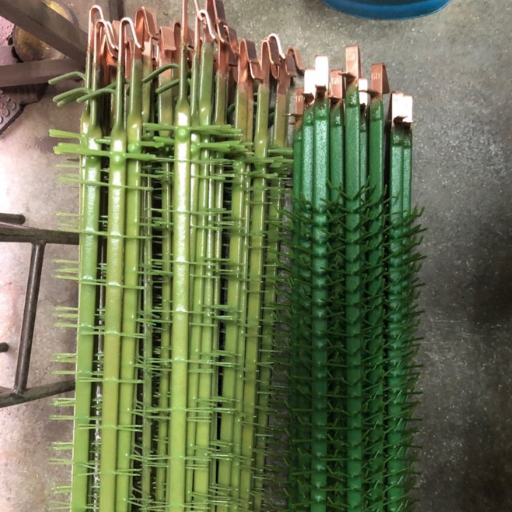
Plastisol coating enhances plating racks by providing a durable, protective layer that prevents corrosion and wear from exposure to harsh chemicals and repetitive use. This coating ensures the longevity of the racks, maintaining their structural integrity and functionality over time. Additionally, plastisol offers excellent insulation properties, helping to prevent conductivity issues during the plating process. Its flexibility allows for a snug, customized fit around rack components, reducing the risk of damage to both the racks and the plated parts. This makes plastisol-coated plating racks a reliable and efficient choice for various industrial applications.
Benefits of Plastisol Coating on Metal Racks
From my research, plastisol coating provides several key advantages for metal racks. First, it offers exceptional protection against corrosion and abrasion, helping to extend the lifespan of racks even in harsh industrial environments. Additionally, its non-conductive properties contribute to improved safety and efficiency in processes like electroplating. The coating’s flexibility ensures a secure, protective fit, minimizing potential damage to both the racks and the parts they hold. Finally, plastisol’s durability and easy maintenance make it a cost-effective solution for businesses prioritizing long-term performance and reliability.
Application Techniques for Plastisol Coated Racks
When it comes to applying plastisol coatings to racks, the process typically involves a few key steps to ensure optimal results. First, the metal racks undergo thorough surface preparation, which usually includes cleaning and abrasive blasting to remove contaminants and create a rough surface for better adhesion. Next, the racks are heated to the appropriate temperature before being dipped into liquid plastisol, allowing the material to coat the surface evenly. After dipping, the coated racks are cured in an oven, where the plastisol solidifies and bonds to the metal substrate. This curing process enhances durability and ensures the coating’s uniformity. https://electroplatingmachine.com/equipment-and-accessories/plating-racks/
What Role Do Plating Racks Play in Metal Finishing?
Plating racks are essential tools in the metal finishing process, as they securely hold workpieces in place during treatments such as electroplating or anodizing. Their primary purpose is to ensure consistent exposure to the plating solution, promoting even coating application across all surfaces. By maintaining stability and preventing contact between parts, plating racks help minimize defects and improve the overall quality of the finished product. These racks are designed to be durable and adaptable, making them a reliable component in achieving high-quality metal finishes.
Importance of Plating Racks in Electroplating
Plating racks play a pivotal role in achieving optimal results in the electroplating process. They provide consistent positioning of components, ensuring uniform exposure to the plating solution, which is critical for achieving high-quality finishes. By securely holding parts in place, they significantly reduce the risk of imperfections such as uneven coating, rough surfaces, or contamination. Additionally, well-designed plating racks improve efficiency by facilitating faster setup and minimizing handling errors during production.
Another key advantage is the durability and adaptability of plating racks. They are manufactured to withstand the harsh chemical and physical conditions of the plating process while accommodating components of various shapes and sizes. This flexibility enhances operational efficiency and lowers production costs over time. Ultimately, the use of plating racks ensures consistent results, reduces waste, and supports the production of flawlessly plated products, making them an indispensable component in modern electroplating operations.
How Plating Racks Affect the Finish Quality
Plating racks play a crucial role in determining the quality of the finish in electroplating processes. Their primary function is to securely hold components in the optimal position, ensuring uniform exposure to the plating solution. Proper alignment minimizes defects such as uneven coating or excessive buildup in certain areas, contributing to a smooth and consistent finish. Additionally, well-designed racks enhance electrical contact, ensuring an even distribution of current across all surfaces of the components. This uniform current flow is essential for achieving a high-quality plated layer that adheres perfectly and meets industry standards. Poorly constructed or worn racks, however, can lead to defects such as rough textures, burnt spots, or incomplete coverage, which compromise the durability and aesthetics of the final product. Therefore, investing in high-quality plating racks tailored to specific applications directly impacts the reliability and excellence of the finish.
Innovations in Plating Rack Design for Better Results
The latest innovations in plating rack design focus on enhancing durability, precision, and efficiency to meet the evolving demands of the industry. Modern racks now utilize advanced materials like titanium and specialized coatings to resist corrosion and reduce wear, ensuring longer lifespan and consistent performance. Additionally, modular and customizable designs allow for better adaptability to specific plating requirements, improving coverage and reducing defects such as rough textures or uneven layers. Enhanced ergonomics and automated adjustments in newer designs also boost operational efficiency, minimizing downtime and improving workflow. Each of these advancements underscores the importance of leveraging cutting-edge plating rack technology to achieve superior plating results while optimizing production processes.
Frequently Asked Questions (FAQs)
Q: What are the best materials to use for plating racks in an industrial setting?
A: The best materials for plating racks in industrial settings include stainless steel, titanium, and aluminum due to their durability and resistance to corrosion. These materials are ideal for supporting various plating processes like zinc, chrome, and anodizing.
Q: How can custom plating rack solutions improve manufacturing efficiency?
A: Custom plating rack solutions can optimize space, enhance the precision of placement, and increase throughput in manufacturing processes. They are tailored to meet specific requirements, thereby improving efficiency and reducing downtime.
Q: What should I consider when choosing a plating rack manufacturer?
A: When selecting a plating rack manufacturer, consider their experience in the industry, ability to provide integrated solutions, and capability to handle a variety of materials like copper, brass, and aluminum. Additionally, ensure they offer robust customer support and competitive quotes.
Q: What are the benefits of using automated plating equipment?
A: Automated plating equipment offers consistent quality, reduced labor costs, and improved safety. It ensures precise control over the plating process, making it ideal for high-volume production and complex designs like those required in electronics.
Q: How do wire fixtures enhance the plating process?
A: Wire fixtures are versatile and can be custom-designed to hold parts securely during the plating process. They ensure even coating and are particularly useful for intricate items like printed circuits and small components.
Q: Can plating racks handle multiple types of coatings like powder coating and painting?
A: Yes, many plating racks are designed to accommodate multiple types of coatings, including powder coating and painting. This versatility allows manufacturers to streamline processes and use the same equipment for different finishing needs.
Q: How do integrated solutions benefit the plating industry?
A: Integrated solutions offer a comprehensive approach by combining material handling equipment, plating racks, and automation systems. This leads to increased efficiency, reduced errors, and enhanced production capabilities in the plating industry.
Q: Are there specific plating rack solutions for delicate materials like aluminum and brass?
A: Yes, there are specialized plating rack solutions designed for delicate materials like aluminum and brass. These solutions ensure minimal contact and prevent damage during the plating process, maintaining the integrity of the materials.
Q: What role do durable materials play in the longevity of plating racks?
A: Using durable materials like stainless steel and titanium in the construction of plating racks ensures longevity and reliability. These materials resist wear and corrosion, making them ideal for repeated use in harsh industrial environments.